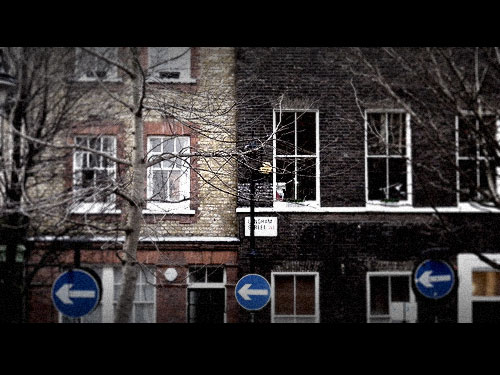
How to turn your photo into movie-like effect using Photoshop?
March 21, 2007 527 Comments


What you need to have: Adobe Photoshop
What you will learn: colour mood adjustments + depth of field effect + film effect
PS: ⌘ key for Mac users / CTRL key for Windows users
Colour mood adjustments
1. Adjust the Hue/Saturation: ⌘U/CTRL-U


2. Adjust the brightness and contrast: Menu > Image > Adjustments > Exposure…


Depth of field effect
3. Duplicate current active layer by dragging it to the ‘create a new layer’ button located at the bottom of Layer window.


4. Apply lens blur on the new layer on top: Menu > Filter > Blur > Lens Blur…
Adjust according to your own preference.


5. Click on the ‘add layer mask’ button at the bottom of Layer window. Then click and select the ‘Layer mask thumbnail’ (the white rectangle).

6. Select brush tool(b), set the master diameter to 400px. Then choose the focus point in the photo and click on it.
![]()


Film effect
7. Create a new layer by clicking the ‘create a new layer’ button located at the bottom of Layer window.
![]()
8. Fill the new layer with black colour: reset colour to default black & white (d), switch black colour to background (x), fill the layer (⌘-del/CTRL-backspace)
9. Set the opacity of the black layer to 70% by pressing ‘7’

10. Use erase tool(e), set the master diameter to 400px. Then start erase the center of the photo.


11. Flatten the image: Menu > Layer > Flatten Image and add noise: Menu > Filter > Noise > Add Noise…


Cinemascope (optional)
12. Add black bars on top and bottom of photo and it’s done!
Use Rectangular Marquee Tool(m) to select (drag) upper part of photo, hold the shift key and select the bottom part, fill with black colour (⌘-del/CTRL-backspace)
You can also add an extra step to twist the colour into this mood by using ‘Color Balance'(⌘B/CTRL-B). Drag the slider towards cyan and blue for Shadows, Midtones & Highlights.
I’d like to donate to ebin.wordpress.com for the contribution.

Thanx a lot for this tut dude. i ve been looking for this
Everything works fine until the blur part. The paintbrush tool doesn’t “unblur” anything. I have CS2. help?
make sure you are painting with black on the mask layer not the layer itself.
Yeah, you have to make the foreground colour in your colour pallet black to erase on a mask.
you can use eraser tool instead of brush tool
Ok, I am at a loss. I am using CS2 and cannot figure out what I am doing wrong. When I get to step 10, I can’t erase a thing. What in the world am I doing wrong?
make sure the foregound color is set to black …it won’t work with white or any other color
use the eraser at 30% instead
I’ll be posting more useful tutorials from time to time. 🙂 Subscribe to this blog if you don’t want to miss them.
http://feeds.feedburner.com/ebin
thank you very much you are awesome!!!!!!!
fantastic! thanks a lot. you’re bookmarked.
Cheers man really good tutorial, just tried it on a couple of pictures and they look ace!
Pingback: Best of April 2007 | Smashing Magazine
Pingback: Web-Design Blog » Blog Archive » Best of April 2007
Pingback: RCC Blog » Blog Archive » Movieify your Photo
Pingback: Webdesign (css, grafica e altro) » Blog Archive » Best of April 2007
Great tutorial! I will surely use this! Thanks!
Great effect. Thanks for the tip.
Cool, why not make a litle action to people to download?
this is very nice !
thanks for sharing ^^
Loved the effect~!
Many people visited this blog after smashingmagazine.com and roscripts.com linked to this tutorial.
I’m glad that you guys can actually make use of this tutorial and apply it onto your own artwork. You can also contact me or leave a comment if you are wondering how to create certain effect that you have seen in somewhere.
very nice!
Pingback: links for 2007-05-16 | SoulSoup: e-learning blog, elearning blog, knowledge management, e-learning strategy, learning experience design, usability
Pingback: 'How to turn your photo into movie-like effect using Photoshop?' listed in del.icio.us today's popular pages « ebin
yah, i just tired these on a photo, did not work. your directions suck, dude!
Pingback: ebin - How to turn your photo into movie-like effect using Photoshop? « Gatika(blog.com)
this is a very cool effect.
thankx for sharing.
Very cool effect!
très sympa, merci !
Pingback: How to turn your photo into movie-like effect using Photoshop » Webdesign Archive
Pingback: Javascript, PHP, CGI, Perl, ASP, Vbscript, Ajax articles, resources and programming tutorials
Pingback: links for 2007-05-16 « toonz
Pingback: » Blog Archive » links for 2007-05-17
Pingback: links for 2007-05-17 « Hic Sunt Dracones
Such a cool effect
Pingback: All in a days work…
Pingback: pristina.org | everything design » links for 2007-05-17
Pingback: links for 2007-05-16 | blog.ftofani.com
Pingback: links van 17 mei 2007 at Andhi.be
Nice one, thanks might come in handy, after my trip to Egypt 😉
Pingback: Techzi » Blog Archive » Photoshop: Give your photos a Hollywood effect
Pingback: Film Effekt für Bilder « Random Noise.
Awesome tutorial, worked well with my test pic only I wish I had blurred it a bit less.
Pingback: Photoshop: Give your photos a Hollywood effect at SoftSaurus
Pingback: Blog Image & Web Solution » Cómo hacer que tus imágenes parezcan de películas de Hollywood
Pingback: Il Liceo » Blog Archive » Photoshop: Give your photos a Hollywood effect
Pingback: links for 2007-05-20 | BrandBrains
Hi, veeeery nice tutorial… i have problems with step 10… maybe my image is too big…?, anyway.. is it too much to ask if you do the tutorial again and post it in youtube… (yep a video turorial…) hehehe THANKS.
Pingback: smalls blogger » Blog Archive » Turn your photos to a ‘movie-like’ effect using Photoshop
This is pretty cool… Is there anyway to apply this effect on an entire video?
I’m using Adobe Photoshop 7.0, but I’m not seeing “Exposure”… ?
Pingback: Give Your Photos The Look « digitaler quality
Step #6 Should brush mode should be set to difference or exclusion?
Nice one. I love stuff like this, HDR in HL2, DSLR cameras etc. Thanks heaps, I’m adding that rss.
Hey there! That’s a great tutorial, so much that it’s almost 4 AM and I had to try my hand at it! Here’s the result; I used a picture from last year’s trip to Toronto. What do you think? I think it came out pretty decent!
Cheers!
Javier / The Outsider’s View – http://www.javieraltman.com.ar/blog
Pingback: links for 2007-05-20 « antifaust
Just wanted to add that this is totally possible in the gimp, even for an amateur.
bummer!!!
PS 8 had no Image>Adjustment>Exposure option!
Pingback: Photoshop Movie Effect - davidgagne.net
Pingback: HANOK web » Archivo del weblog » En Busca de Olas
DS: If your photo is very big, you need to make the erase tool bigger by hitting ‘]’ before click to erase, adjust and test until you satisfy with the result.
Hi Ebin,
Could you be more specific on step 6. When I choose the focus nd click on it, nothing happens.
Is there something that had to be done in between??
THanks
Rosario: Photoshop earlier than CS2 has no Exposure feature. However you can try using ‘Brightness and Contrast’.
Jared: Since I am not sure what is ‘difference’ and ‘exclusion’ you mean, I’m just gonna tell you that the brush should be BLACK color in the layer mask thumbnail.
Pingback: Photo to Movie Shot in a few easy steps | jonathan.mccarthy
Hi and thanks very much for the great tutorial! I used it to great effect on this photo:

I put a link to the tutorial there too, in the comments.
Pingback: Geek Revolution - Photoshop Tutorial: Hollywood Effect
Ciao Ebin!
I found your tutorial so useful, I made a little action to automate most of the effects you describe. I just added a couple of tweaks to it: on a particular point you tell the users to flatten the image. I applied a Ctrl+Shift+Alt+E action instead, making a copy of all existing layers and then merging those!. At the end of the process, when you describe how to apply a blue filter to the resulting image, I added a simple “duplicate layer” action, so the effect is put on a new image instead of the original. I think it’s best this way, what do you think?
You may find the action on my site 🙂 Enjoy!
Hey ebin! I think you missed my comment, but can you tell me what you think of the results I got on my photograph? Thanks a bunch!
Cheers!
Javier / The Outsider’s View – http://www.javieraltman.com.ar/blog
Pingback: Photoshop: Hollywood Effect « EMONOME
Great tutorial. Thank you! 🙂
Pingback: pligg.com
Wow, this is great! Nice job. I’ll be adding your site to my del.icio.us.
Mine seems to go wrong at the Depth of Field, seems not to work….(nothing happens when using brush tool)
What version of Photoshop Elements is this tutorial in? I am currently using Photoshop Elements 5.0
Pingback: weekend link fix at Daily.Phirebrush
Pingback: Give your photos a Hollywood effect (Photoshop) « News Coctail
Pingback: Dot-com Blog | Piše Nikola Vavić » Blog Archive » Filmski efekat slike u Photoshopu
Very cool method.

I suck at Photoshop, but I just wanted to show off my pup’s picture after the film effect treatment:
Fantastic!! Great job! Been wondering how they do it
wow!!
nice tip, thanks
😀 ohh my god
i feel like a Steven
Pingback: Wicked Sick Tutorial: Make your photo's look like a movie! « m a r k x . w o r d p r e s s . c o m
ok welli have tried 2 pictures now and they come out looking dark as all hell, im following the steps exactly…
Pingback: Gluten Boy » Comme dans un film
Great tips – thanks.
Pingback: links for 2007-05-20 | klick wech | XSBlog2.0beta
Pingback: links for 2007-05-20 | klick wech | XSBlog2.0beta
Huzzah! It’s the “make everything i do look like something out of lord of the rings” tutorial…
shall still be doing it shortly to see how my pictures turn out. thanks.
Whenever I do this on the exposure step my picture is way too dark. I am doing a picture of me when I am standing outside and I can’t even see my face or half of the picture.
Pingback: links for 2007-05-21 | Patrick Kempf
Pingback: links for 2007-05-21 « Richmond Kills Me
Pingback: Photoshop: the ‘Hollywood Effect’ at Squid
Tried my absolute best to apply this directions word for word and did not succeed. I think it could be re-written just a little better.
Pingback: Give your photos a Hollywood effect (Photoshop) « Crack Caffeine
I tried this tuturial and I liked it!
this is before: http://www.flickr.com/photos/vladkuz/506923801/
this is after: http://www.flickr.com/photos/vladkuz/506923809/
Thank you!
Amazing can’t wait to try this! ~BookMarked~
would be great if you could come up with a Action Script for that.
Very nice tutorial. Thanks!
Pingback: PCTORONTO.COM - Your Toronto Computing Resources » Blog Archive » Hollywood Effects with Photoshop
thanks for the nice tip. i just worked on some of my photos. voila! it changed the whole thing! keep it up!
Thats this came in very handy and helped me with some of my picture in my album and they look really nice thanks to this article.
How about a tutorial on creating a Soap Opera effect like Day of our lives or any US daytime soap opera…
Pingback: How to turn your snaps in movie-like stils - TechEnclave
Very very cool. Props for the site not going down because of the Digg effect.
Could you maybe post the same howto for GIMP?
This is a very cool tips. I like it.
BOOKMARKED!!!
Although nifty, and a really helpful tutorial for those so inclined, all of these effects aren’t really required to make your photos look like stills from a movie. It really depends on what you’re photographing. For instance, the name of my company is LetterboxTen because of the cinematic effect my images have. Of course there is post processing, but I don’t use any crazy manipulated methods to produce my photos. Check it out if you want. letterboxten.com
Pingback: links for 2007-05-21 » Graham English Social Networking
Pingback: Give your photos a Hollywood effect (Photoshop) | Syaf The Geek
Pingback: The Lab47 » Give your photos a Hollywood effect (Photoshop)
I need help~ i tried to follow your step by step procedure. Realised, when i wanted to go to Menu > Image > Adjustments > Exposure…, I couldn’t find the exposure selection, why?? I’m using photoshop 7.0. is there some application i need to downloaded from?
Pingback: How to turn your photo into movie like effect using photoshop | yougo
Pingback: roxzen.com | Design, Wordpress, Multimedia Tips & Tricks, Fashion, Resources, HTML/CSS, Photoshop
Pingback: » Give your photos a Hollywood effect (Photoshop) » I Only Wish
Very nice, thanks so much 🙂
nXqd
Pingback: Efecto Hollywood con Photoshop | Refugio Antiaéreo
Pingback: webwards » Blog Archive » Photoshop: spettacolare effetto cinema per le tue foto
Pingback: Photoshop tutorials - Page 3 - Latforums
Pingback: links for 2007-05-21 « Breyten’s Dev Blog
Pingback: Peecha Blogs » Holivudas Foto
Pingback: Toinen Betatesti » Blog Archive » links for 2007-05-21
Here’s my attempt on an image of Fenway Park in Boston, Massachusetts:
Very Nice!
Pingback: Creative Guy » Blog Archive » Give your photos a movie screen-like effect
Pingback: somaninn.net - le weblogue » Blog Archive » Rendre vos photographies cinématographiques
Pingback: somaninn.net - le weblogue » Blog Archive » How to turn your photo into movie-like effect using Photoshop? « ebin
Pingback: lxrichter.com » Blog Archive » Photos with movie-like effect
Very nice effect, and very simple to tweak for different styles.
Here’s my first two attempts with it:
http://www.deviantart.com/deviation/55800972/
http://www.deviantart.com/deviation/55805443/
This tutorial might as well be titled, “How to turn a good-looking photograph into a crappy-looking photograph.”
Pingback: Give your photos a Hollywood effect (Photoshop)
Pingback: 11 a.m. » links for 2007-05-21
Pingback: Dale un efecto "de película" a tu foto
Pingback: Give your photos a Hollywood effect
Great tutorial! Looking forward for more 🙂
Works great… I think it would work great at a template, and not an action. If one has diffent sizes pictures….
here are my results.
Step one should read ‘rotate photo 2 degrees counter clockwise’
Pingback: Freeze Frame « The Wedding Photography Blog
Pingback: links for 2007-05-21 at blog.bagaki.com
Pingback: zappd » Blog Archive » Photoshop Tip: Add a Hollywood effect to your photos
Excellent tutorial. I had to tweak it a bit for my photos, but other than that, the general idea worked wonders. I just wish I had some pictures it would look good on.
Pingback: The Blog of Clint Andrew Hall » Blog Archive » New Picture Technique
Thanks for this… it gave me some good ideas. Check out my blog to see my attempts.
Kudos!
Pingback: Phil Nelson » Blog Archive » links for 2007-05-21
Pingback: links for 2007-05-21 « linksnstuff
Pingback: links for 2007-05-22 at orioa
Pingback: JeffCaylor.com » links for 2007-05-22
Pingback: FreedomWings
Pingback: Comanche Hill » links for 2007-05-22
Pingback: RazorSharp iPods & Raw Gadgets » Blog Archive » Give your photos a Hollywood effect
Pingback: .:: ju ::. » links for 2007-05-22
Pingback: zegutdan.nl » Blog Archive » Maak van je eigen foto’s fil shots
very nice tutorial though I also have the problem at step #6. when I click on the photo by having the brush activated nothing’s happening. could you please give som help?
Pingback: ifuzz » How to turn your photo into movie-like effect using Photoshop?
oh!! Cool!!
Pingback: Tutorials / Image Manipulation - Tinting Effects (Photoshop)
Pingback: the accused » Blog Archive » Turn your photo into movie-like effect - Gimp Version
It’s don’t work for me TT
I can’t put focus on my image!!!!
Ohhhh gosshhh!!!
Pingback: STE7130 » Links vom 23-05-2007 :
OH NO!!! You’ve been ripped!!
Great tutorial thanks!
Looking forward for more stuff from you!!!!!!
Good One Dude !
Keep it up.
Pingback: Consigue un efecto de película en tus fotos
For those who would like to get this effect done in GIMP, go to Gimpology
Pingback: Cubma » Blog Archive » och här kommer ett skepp till
Pingback: Link Roundup: Gnawing Hunger Edition › goldengod
Nice technique – will certainly give it a try.
– Paul @ http://www.photographyvoter.com
Pingback: CyberTopo » Donnez un look professionnel d’Hollywood à vos photos
Pingback: links for 2007-05-24 « Better Than Nothing
esta bueno esto
Pingback: Mid-Week Coffee Break for 5-23-2007 » Coffee and Celluloid
I wonder how this would look on actual DV-footage using the same steps in After Effects or similar.
Pingback: Photoshop: How to make your photo look like a movie shot! by ComNetSlash
Nice!
Pingback: Niklas’ blog » Blog Archive » My Del.icio.us bookmarks created during the past week
Very nice tutorial.
Pingback: Dê um clima de Hollywood para as suas fotos « Favoritos
Pingback: Best of April 2007. (Out dated, I know!:) « Pieces of 9
hi.how are you .tis a good barmh soma tank you az plz for me sand meil bye bye all
Great tutotrial. Thanx A LOT!
Pingback: Fotos de cinema... « Márcio Guimarães
just great! thanks a lot from germany!
thanks… great tut.
hoping for more good things pal.
Pingback: Dave’s Photo Blog » Irish Bay, And A Beginning
Here is my attempt. I manipulated a picture I took while in Paris a couple of months ago:
Building Before
Building After
süper bişey bayıldım!!tebrik ederim harika!! bende yapıcam böyle bişey:):):):)
nice tutorial
http://crimsdings.deviantart.com/ , uploaded my pictures to deviantart (with your tutorials with full credits) :p
thx for this awsome tutorial
Pingback: r3v.com » Blog Archive » links for 2007-05-28
Pingback: Tekjuice.com » Blog Archive » Best of April 2007
Pingback: Photografía | Fotos en Cinemascope
Oh man…what a tut !!! Just made me clinch a great advertising deal. Thanks a bunch man…
Pingback: Give your photos a Hollywood effect (Photoshop) « NewsDigg
No clue how I missed this. It’s a great effect. Definitely not boring and definitely something I’m going to try in the future. Thanks!
Pingback: link: nice little tutorial on converting images to film-like effect - Simonas Nareckas blog
Great tutorial! Thanks a bunch Ebin!
This tutorial rocks!
Pingback: Dave’s Photo Blog » More Film Effect Photos
wow, that’s a nice tutorial, gonna try it out on some of my photos 🙂
do u have a tutorial that turns movie-like-effects into pics??
Pingback: Web Strategy by Jeremiah » Web Strategy Reading, A Roundup, June 4, 2007
Pingback: Tranquify - Turning photos into movie-like effect using Photoshop
Hey, Am having problems with step #6. Whenever I try to click the photo using that brush (400px and normal mode), it always shows a white light. I know that its suppose to be transparent but its not. Help me please. Am using CS2.
Thsi is great! it works with video too!
Pingback: Como darle a tu foto apariencia de película (Photoshop)
Pingback: CMP2.NET | Design,Multimedia,Internet,Security | » Blog Archive » Seçmece tasarım
Pingback: Turning a photo into movie-like effect : Roi de la Gala
how do you do step 6. I cant make it beocme focus
Pingback: Das neue Tagebuch vom Ei.
Hi!
Very much likde the effect, made an Action for Phhotoshop.
You can download it here:
http://www.zeitlupenbaer.de/wp-content/uploads/Cinemattic.atn
Thanks for the Tutorial!
A nice, simple, clean and clear tutorial. Thanks much for this.
Pingback: Photoshop Photo Effects - Tutorials at Negative Silence Web Design - Scream, Be Heard, Make Noise.
You can also use this technique applied to Filmstrip files in Photoshop, which can then be imported into After Effects for use in full motion video
Great tutorial! Keep up the good work.
Pingback: Exasperated Calculator » Blog Archive » Photography
Oh my god, nice!
Pingback: Cool Photoshop Effects «
Pingback: links for 2007-07-12 | iSurflite
Pingback: Reality is as real as your own imagination!
Pingback: links for 2007-07-20 » The Gryphin Experience
Pingback: Everyone should have at least one Gotchi! » Filmeffekte für Fotos
Great tutorial dude 😉
Thanks
Muito bom, fazia tempo que eu procurava um tutorial como esse…Parabéns
Very good, it did time that I searched a tutorial as that…Congratulations
Pingback: 6 Ways To Take Amazing And Original Travel Photos | Travel Minx
its fantastic.thus any 1 know a website frm which i could download {adobe photoshop}if yes then contact me …..my ID :-me_naughty_cool_girl@hotmail.com.
I’ll have test this, looks cool
ooo yeha :D, gracias por el tutorial
Nicely done, I’ll try this with TheGimp but using a filmgrain effect instead of noise, and vignetting with gradients, there is even a plugin that blurs the image accordingly to a source gradient it’s called “focus blur” or fblur.
Which version of Photoshop is this? I’m using Photoshop 7 and I cannot find many of these options.
Great Effect, some photos just get a new life. thanks
Very useful and informative blog. Recommended for all to see.
http://medsdrugs.blogspot.com/
Very cool. I tried this in after effects and was able to pull off the same effect on video.. very nifty.
tnx.
good work
Pingback: Razvan Antonescu » Blog Archive » links for 2007-08-12
Pingback: 11 Super Awesome Photoshop Movie Effects | iamSalman // myBlog
It works in other versions of photoshop too, but you have to get a bit creative.. But, still, love the effect!
Pingback: pseudotecnico:blog » Photoshop: effetto cinema
Pingback: Bored? » 11 Super Awesome Photoshop Movie Effects
Pingback: links for 2007-08-13 « napyfab:blog
Pingback: 9 tutorials » How to turn your photo into the 300 movie-like effect using Photoshop
Thanks, a great resource and inspiration. Keep making tutorials like this.
Pingback: ggali Blog » Blog Archive » Effect filem hollywood dengan photoshop: Bahagian 2
i am using photoshop 7.0 i cant find were the Exposure or someothers help please
Pingback: rossparker.com » Blog Archive » Cinemascope
Messing about on Photoshop, with this technique. End result:
Not as great as I was hoping, but will fiddle.
Pingback: Traffic Citations, Lead-Filled Toys and, Gosh, Stealing by Ad Dismissal! « speakeasy(X)
Pingback: Mariah
splendid tutorial!!!
Pingback: Walking out without fear… « Just another me
very nice
added to
Pingback: Dede Blog » Esperimenti con Photoshop: immagini con effetto cinema
Thanks for this. Just was I was looking for! Faved.
Thanks for this tutorial!!
Pingback: Viscido Blog » Photoshop Tutorial: Come rendere le vostre foto simili alla riprese di un film
Pingback: Popular Photoshop Tutorials this Week » Free Photoshop Tutorials and Resources
Great design tutorial!
Pingback: Turn Your Photo Into 300 Movie Like Using Photoshop | Blinkblog - When A Jerk Blog Become Famous
hye, this is a great tutorial. I had made a video tutorial based on yours. exactly following your techniques..thanks!
http://www.blinkblog.net/2007/10/11/turn-your-photo-into-300-movie-like-using-photoshop/
Well this is excellent. I will try this now…
Great article. A little to beet complicated but for sure I should try this.
Nice! You gave me great new ideas! 😉 Thanks!
nice! saw this on http://www.mr-tut.com/
thnx alot
yaaaay! this is awesome. i made this picture of me wearing a sombrero and takin a shot look like a movie still!
very nice ….
thank you for nice work …
Pingback: Eric
i really love this. thanks for posting.
You are a really big help on student graphic artist like me.
God Bless and more power!
This is a very cool tips. I like it.
Interesting effect. It’s quite a nice outcome. Keep it up.
That is a very nice effect. Thanks for the tip 🙂
great tip – i’ll be using that soon.
thanks alot bro. this is really cool.
Thanks for sharing! I might use it sometime.
This is wonderfull. Many thanks!
Hi.
Good design, who make it?
Cool effect and I’m trying it out right now. The current settings in this tut may not work as good on the image your using. It all depends on the image. The setting stated here are too dark for my pic.
Great tutorial – exactly what I needed for the latest project!
cool man! StumbledUpon! 😀
thanks for sharing such great tutorials.
i will credit you if ever i use these effect! thank you!!! 🙂 *hug*
thanks dude.. good one..
Beautiful !!! thank you…
Pingback: Photoshop Tutorials for the Movies : DigMo!
Cool!! I tried it and it works fantastic.
Nice effect, but you don’t need Photoshop. I used the Gimp! Although the menu’s aren’t the same, you can get the same effect. Gamma adjust in The Gimp is under Colors -> Levels. Gamma is the top middle slider. All other adjustments should be familiar if you used to The Gimp. Here is my source: and the result:
thanks…my client loved the final product…we’re going to use this tut on the rest of his cd cover/booklet…
will try it out when i have the time. nice one! well done!
Pingback: Adobe Photoshop Tutorials - Best Of | Tutorials | Smashing Magazine
It reminds me alot of how call of duty 4 sorta looks. I love it.
Pingback: » My del.icio.us bookmarks for January 11th (Adobe Photoshop Collection) at StuartAnderson.eu
How about creating a Photoshop Action for this!!
Nicely structured tutorial. Thanks for this.
Pingback: Большая подборка уроков по фотошопу | Фото XPерт
I love this tutorial…and u for giving us such cool tutorial ;P
This is very nice: I ve search for something like this.
this is really nice!
Pingback: Craft Paper Online Blog » Blog Archive » ROUNDUP: Cool Tools for Craft Bloggers & Digital Designers
Hey ! great tutorial, awesome effect 😉
For some of you guys, it’s pretty hard, but make sure you follow the steps EXACTLY. I’ve done it many times with different Photo Filters and it’s pretty successful!!! See this link:
http://www.friendster.com/photos/12843339/1/717659203


I realy enjoyed your Tutorial! 🙂
Greetings from Germany.
my before and after shots….
before

after
could you post the images again.
thanks,
it was a very useful tutorial
thanz
Pingback: Blog of World's Sanyi » Altri trucchi per Photoshop
Pingback: Readerslab » The 50 Most Popular Web Design Blog Posts, Resources & Cheat Sheets of 2007
Pingback: Recursos y Tutoriales » Blog Archive » Los mejores tutoriales de photoshop
Great Tutorial. Nicely Done!
Amazing tutorial, but…
On step 6 I think that it must say:
6. Select eraser tool(e), set the master diameter to 400px. Then choose the focus point in the photo and click on it.
using a brush doesn’t work, coz we need to open a hole on the mask…
thanks a lot!
Great tip : )
thank you, it has great effect to my photos
that’s a good one
Rather than erasing or masking after applying the effects, I think it would be easier and more effective to do a quick mask by pressing ‘q’, create a radial gradient for the focal point, press ‘q’ again, then apply the filter. That way the effect will gradually increase as you move away from the focal point.
thanks a lot!
I couldn’t find:
Menu > Image > Adjustments > Exposure…
in Adobe Photoshop 7.0 version.
Bcoz, that is an imp effect to be made.. i couldn’t proceed further…
could anyone please please please find a solution to get ‘exposure’ panel ….
thanx in advance,
This effect make the photos totally different, really have movie feeling.
I will make a travel photo for my girl friend as her wallpaper, I hope that she will love it.
Thanks a lot!
I can’t get the layer mask working, I use the brush tool but it seems I’m doing something wrong since I can’t make the focal point appear.
Any tips? Where I might be going wrong?
amazing , it helped a lot 🙂
Wow.. this is freeking awesome! I love it! Great job on the post and showing the images of the PS buttons along the way. You rock!!!!!!!!!
@ setp 6 : Ensure you have the White color as background color after having selected the mask and your brushe.
Cheers, Thank for this tut.
Hey..nice tu..
but..what about turning my video footage into movie-like effect? like this with the photo.. do you know if it is possible in adobe premiere maybe?
Hi We have photoshop 7.0 on windows XP but on my photoshop adjustments we don’t have EXPOSURE. Can you tell me where it is?
Thank you
I love it
great
for many day i was thing about this effect
now i get it.
thnx
i cant get the 5 step to work for me i create the new layer mask I select the white rectangle, change the brush to 400 click on a focus point and nothing happens.
please help me.
wonderful and very helpful!
i get confused in section 6. . Can you explain it a bit more? When I choose brush and than when i click on photo, nothing happens. Probbably i am doing something wrong, but i can not figure it out what.
thanks
super. thanks
This tuto isn’t from u u copied it from 9tutorials
good effect! see my photoshop vista effect in http://dzibril.webs.com
Pretty cool effect, bro, thanks a bunch!
cool!!! very nice thanks for the tutorial
Great stuff!! Very helpful!! Thanks for having this tutorial…
Great Totorial. i am very pleased.
Refreshing tutorial. Thanks
Thanks for a fantastic tutorial that was really nice
Very useful, thanks!
Thank you so much
I really love this tut
HI, thanks very much for the tutorial. I learnt a lot of tips from it which I’d been taking for granted with auto-tools in Picasa. I’ve had some great results from unexpected pictures with it.
Its fine but i saw better then this tut sorry 😦
it is awesome
is this malacca? 😀 ❤ the effect!
thanks great tutorial!!! now i can try in my personal photo…!
good thank you
Hey! I’m trying to do these tutorials, but when I go to Image>Adjustments, Exposure is greyed out. How come? How do I un-grey it?
great technic, good job…
AWESOME…….!!!
nice, thanks!
Great tutorial… thanks
Just Amazing !!
Great tut, but it works only for the tutorial-picture, this never worked on any other pictures for me. At the exposure changing step f***s up the colors :S I tried different settings but still bad..
Hey i cant find the exposure in adobe photoshop 7 how can i do this some one help pls pls pls
Regarding step 2. i couldnt find the exposure option. I’m using photoshop 7. Is there another way to achieve the same effect?
thanx a LOT!!i dug for this for years..i think.. 🙂
Thanx a lot for the tutorial, but I was actually interested in making a video lool like this instead of a photo. Did anyone try this on home made video? I was wondering if I could convert avi movie into a adobe filmstrip FLM, and then apply all these settings to all the frames, and save them into avi. I assume that we will have a Hollywood moving picture, ain’t we?
Thanks for the tutorial, i loved it 😉
Hello again. I find this tute very interesting but , like i’ve said, it is not a hollywood picture that I’am interested about but in Hollywood moving picture. My idea is the following:
1. Convert avi to filmstrip with adobe premiere
2. Apply this settings of the above tute to all the frames of the filmstrip
3.Convert it to avi again
4. Hollywood moving picture instead of a picture.
Is it possible?
i agreee with “Deez nuts”
the second step is way off, ithink
Very nice tutorial…
nice tutorial
that amazing , i will use on my next trainning,
That’s an awesome effect! Definitely will work nicely for some of my wedding pictures 🙂
Well this is great tutorial thanks!
Looking forward for more stuff from you!!!!!!
I was trying an effect similar to this one the other day, have I found this tutorial earlier it would have saved me more than 30 mins. Thanks for sharing.
Спасибо! Интересный эффект. Обязательно испытаю на своих фотографиях 🙂
awesome tutorial!!!!!!!!!! i jus wanna ask … do these need high quality photos?
thank a lot of from colombia . that´s amazing
An excellent guide =]
Brilliant, thanks so much for the guide!
let say in my language..Hili ni somo zuri sana..that is “this is very good tut’
i like it very much and usefull for my job..
Very nice tutorial mate!
it’s amazing, but for some reason i just can’t get the focus point right heh
Thank you
I’ll try to do it
I was trying an effect similar to this one the other day, have I found this tutorial earlier it would have saved me more than 30 mins. Thanks for sharing.
This is a great tutorial ! I love it.
I was wondering if you can make a Photoshop Action out of this. It would be very nice.
cool dude
finally, thanks for this reference…
Thank’s very much.
Ola. i try this but at the end for shadows and etc the picture turn really bright. can anyone tell me what im doing wrong? i got photoshop CS2 for windows
Great tutorial. Thx!
I need help with Step 9!! I followed your instructions exactly but when i change the opacity to 70% nothing happens. The black still remains as a solid colour. Somebody please help :X
I tried this tutorial and I can say that is awesome.Thanks.
Thanx Appreciated
thanks for posting this tutorial. i’ve used it a few times and love how it can make a mediocre shot look dramatic and artistic!
Nice tut dude… Thanks
can i use this even if i dont got photoshop??????/ cuzz i dont Lolzzzzzz
Thanks a lot for this tutorial. Have been wanting this since ages. Thaks again.
Pingback: 40 Best Photoshop Photo Effects [Adobe Photoshop Tutorial] - Chat DD Forums
Is it possible to do this effect with photoshop elements 3.0? I know i’m way out dated..but it’s all i got…
Thanks a lot for the tutorial! Given me lots of tips about post processing my photos. Thank you!
I am very enjoy your blog, your blog is very true of the stick, you would like to see more blog content! I wish you a happy day!
hey very good tutorial
thank you!!!
nice blog
wow!it looks cool!
u’r genius))
Falto yo!!!!…… Perfecto que gran tuto…felicidades,….Maurice
i get new knowledge from this post, thx
I like this tutorial. The only problem is that the result is too dark IMO… is it a problem of the photo or what? Still, great tutorial, I’ll be using this many and many times. 😀
nice, really nice!
taking such a plain photo and ending up with that is an inspiration to all of us!
Nice guide for photos. Thanx, Really interesting
thnx for this tip, but I HAVE A QUESTION
step 6
u use black brush and the focus appears at that place on ur photo
i do can’t understand how it was
when i do this way, blur (step 4) doesn’t leave at the place where we using brush
what should i do?
////
sorry for my eng – i’m from russia 🙂
step 6 didnt work for me. what am i doing wrong?
wow!.. great post.. been looking for something like this.
Nice tutorial! Hopefully it will help me at work. Slumberg (aka Turtles Slumberg)
Well done great article.its really help full to understand most of the photo shop software related problems that how we can turn any photo-album into a video..keep it up.
Pingback: How to get these tones. Any ideas - RetouchPRO
Awful
eBin, Thanks for great tutorial. I will try this technique on my new photos!
Cool!!!
Nice!
http://www.jm-experts.com
Nice!
Very Nice tutorial! Love it!!
very nice tutorial.
thx for sharing.
and keep it coming.
Hi, I’m having trouble with step 9. I just don’t seem to be able to fill the layer, it doesn’t go black when I try to do that.
Could someone please tell me how to do it? Or if there’s anything missing in Ebin’s explanation? I know it’s a very silly thing but I can’t do it and I’d be very grateful if you could give me a hand 🙂
great tuts!
Thanks for this CINEMATIC EFFECT TUTORIAL
Thank you very much for the nice tutorial. I’m making lots of my family album pictures like this.
Hi, for those people that say that this doesnt really work for them when it comes to exposure part: think! of course not every photo will work with same setting, what are you trying to achieve with exposure is more vivid whites and darker blacks, try going around 0.6 with exposure and fine tune to make white parts vivid, then with offset try ro darken the black parts, dont play much with gamma setting, it ruins color. slightly(10-20) left or right will do but no further.
And also if you try to achieve the bluish effect thats shown at bottom of tutorial but it doesnt really work for you then do what i did, switch to CMYK mode, select your image layer, go to levels, from drop down menu choose cyan, then play with midtones slider, about 25% to the right should give you the effect, cheers and good luck with it, also for author: great tutorial man.
do you do this on the internet
Great Info, thanks for sharing it with us.
Fred,
Hi! I was surfing and found your blog post… nice! I love your blog. 🙂 Cheers! Sandra. R.
Thank you for this great topic
Thanks a lot cool! tutorial
this looks like absolute shit.
Very very nice, Thanks form México
Thanks for sharing!!!
great tutorial..
keep posting…
thanks..
hmmm.. so inspired…
Great Tutorial, been looking for something like this
Thanks! I liked the “Terminator Salvation” style and atmosphere very much, with your tutorial i transformed this photo from a friend of mine, during a storm on a Dutch beach:
Looks pretty much like a soldier in a post-nuclear-apocalyptic environment i think, i only miss some burned skulls 🙂
Good Tutorial! thanks!
I’m having some trouble with step 2. When i lower the offset it really REALLY messes up the whole thing. It’s not giving me a result anywhere near yours. I mean.. it just darkens all the dark places. Does this only work with hq lighten up pics? I tried using different options but i still can’t get a good result like in your example. In yours you don’t loose ANY quality after the exposure, and when i try it, it just comes out like shit.
Whenever i try the 2nd step, my result is NOTHING like yours. The offset messes everything up and makes it look very low quality. Can you just help me out?
Thanks!
This is so ninja 🙂
WOOOOOOOOOOOW SO INTERESTING… NOT!
Just follow the steps exaclty and you can do it .. if i could you can as well 🙂 great tut. i want more of these 🙂
Bookmarked 🙂
Going to attempt this right now. Thanks
thank you great to share
wow how can i get photo shop on my desktop so ican do that?
Great done and keep posted. Looking forward to reading more from you.
Your site was extremely interesting, especially since I was searching for thoughts on this subject last Thursday.
I’m Out! 🙂
Great tutorial! I thoroughly enjoyed this tutorial! Thanks!
Nice post, love it.. tks much.
thanks
very Informative post..thanks.
it doesnt work on any of my foto’s…m really upset…w0t shd i d0?
Very useful tutorial…
Nice tutorial……… it’s really wonderful……..
It’s great example what Photoshop can do. Thanks for this article.
Thanks for sharing!!!
wow , i tried using it on most of my PS work…
great one thanks a lot.
Photoshop is a great tool but at same place i try to use flash for move purpose.Because there is no better tool than flash for movie purpose.Thanks
Nice tutorial.
Thanks.Great tutorial! Keep up the good work.
Hi…..
Good tutorial….. I am waiting for your next post.
thanks
hey, thanks a lot. There are so many possibilities for changing the setting. I learned a lot from your post and will try it with my next photoshop session.
Nice, can’t wait for cs5:)
Thnx for the illustration really like this post
Thank a lot … very nice tip.
A great post.
Are you starting with a raw file? When I followed your tutorial using a jpeg the adjustments were much more drastic… I will try again on a raw file when I hook back up to my hard drive.
nice tutorial!!!
hola
i’m so glad that i saw this article. that posting was so helpful. thanks again i saved this site.
are you planning to post similar news?
Nice tutorial. I think it’s great way to make my photo look classic
Great post, thanks.
Thanks for sharing!!. nice one.. but there’s one step is not working when i try to click on the focus point.. i skipped that step and use the erase tool instead.. it works for me 🙂 Thanks for sharing!
wow!Its great effect…..and thanks for ur support.
Nice tutorial, i had really good results. Perfect :_)
Wow great tut
thanks
cine like feeling.
***********************************************************
Hi, who has that as PHOTOSHOP ACTION to download ??
***********************************************************
lo kok pas image>adjusment exposurenya g muncul ya,,
mohon dikasih tu donk,,
mklum pemula,,
hhe…
Frustrating, I’ve done this twice now and I can’t get it to work. I keep ending up with an image covered in 70% black with the black in the focus point erased. So the focus point is erased, but everything is still black. Not sure what I’m doing wrong here, I feel like I’m following the steps perfectly, but obviously not.
Its been fixed. Apology for inconvenient. 😉
OHHHH.. it very cool; I like it, This guide help us to make very interesting photo
Thanks
Inspirational to say the least! Some gorgeous imaginations at work!
tanks its very usefullllllllllllllll
Lovin’ the design of the site, would you mind telling me if you have a place for more templates, I’m in need for my site about downloadable flash games online. Send via email thanks.
Hi, with the abundance of crappy blogs around the web, it’s great to see that there are still some filled with quality content! Is there any way I can be alerted when you post a new article? thank you!
Hi Love Pearl, glad that you like the post 🙂 You can subscribe to the RSS feed by clicking the lil orange icon on the top right corner. Alternatively, click the ‘Sign me up!’ button under Email Subscription.
Having some issues with this – I think I’ve got the steps down, but the blacks are to dark and especially at the exposure step, the photos I’m trying this on get far too “moody” if you will.
Any tips?
Thanks,
Stephen – shuttersandsounds.wordpress.com
I have been checking out many of your articles and it’s clever stuff. I will definitely bookmark your website.
Nice tutorial
Great information I like this thanks.
hey does anybody know if it is possible to add these black bars also in lightroom 3?
thanks, t
that was great!
Nice Work man Your blog is so great.Thanks very much for posting this topic
Very interesting your article, thanks for sharing this knowledge.
thanks.
Hi webmaster, commenters and everyone else !!! The blog was absolutely fantastic! Lots of great info and inspiration, both of which most of us need!b Maintain ’em coming… you all do this type of fantastic job at such Concepts… can’t inform you how much I, for one appreciate all you could do!
Couldn?t be written much better. Looking over this post jogs my memory of my old room mate! He always kept referring to this. I will forward this write-up to him. Pretty sure he will have a good read. Many thanks for sharing!
This is a very good post. By the way, is blurring necessary? How do we proceed without blurring? For instance, something like this: http://www.filmofilia.com/wp-content/uploads/2010/12/Ip-Man-2.jpg and this http://goninmovieblog.files.wordpress.com/2010/05/ip-man-movie-still07.jpg.
Cool tutorial – really simple but really effective. Thanks!
TRULY AMAZING TUTORIAL.
I HAD BEEN LOOKING FOR THIS FOR MONTHS.
IN SOME MOVIES I HAVE SEEN ONLY THE FIRST STEP i.e “Colour mood adjustments” WAS DONE ONLY.
EVEN THAT ALSO LOOKS GREAT.
THANK YOU A LOT FOR SHARING SUCH A TOPIC.
Hey, was that photo shot in Melaka, Malaysia?
Yes it was. 🙂
great post, i have learned a lot from your post http://www.replicawatchesgeek.com/watches/replica-fucda-1776.html
this technique sucks.
you haven’t explained the rational for doing anything!!!
thanks for the tutorial I needed
it’s really gr8 thnx dude.
wow! i’m looking for this technic long time thank you from tutorial.
but in my photoshop
no option of lens blur
what can i do…..
but nice work budyyyy
Hey Tnx for this great Tutorials…
у вашего блога приятный диз, сами верстали?
тайна фамилии журавлев
спасибо!
Nice technique, haven’t tried this one yet and looks like it’s going to be an interesting effect to add on my next project. Thanks
no one had trouble with step 7….? i dont understand
Very simple to follow tutorial, thanks. Anyone having trouble with certain steps or certain Photoshop tools, I suggest Googling the specific tool in question, if you know how to use everything, this is really easy tutorial…
Tutorialnya bermanfaat sekali ini untuk semuanya yang suka belajar photoshop. Tolong keluarin tutorial tentang Web Design dong. Pasti banyak yang membacanya nanti.
thanks for sharing! just having a good time following your tuto with a photo of mine, just amazing!!
Thanks for the tutorial. I will try it as soon as I get out from work, I looks just awesome.
I Love you…
Thanks four you at information?
Terrific information on Search engine optimization, thanks for posting Day 8 |!
Thank You Photoshop..
i cant get exposure option in my adjustment option…..i m using photoshop 7.0
is photoshop shop 7.0 the latest version?
bcoz i can not get many options that are given in tutorials in my photoshop…
which one is better photoshop cs3 or photoshop 7.0?
plz reply and help me
I find out a thing new on several different sites each day. It will always be exciting to discover written content of other copy writers and learn a little some thing from their website. Thank you sharing.
thenk you guys i like it i wanna try
nice tutorial! simple tutorial but great effect!! thanks a lot!!
can you please explain step 5 and 6 i didnt get it!
Good news! But is better!
Great tut !! loved it …!!
thanks for the tutorial I needed
Thank you very much!!! I’m new with photoshop so it was complicated to follow other tutorials thankyou again 🙂
Awesome tutorial man… Didnt know it was that easy to achieve the focus blur effect!
Thanks, I’ve been looking to learn how to do this for ages 🙂
in my photoshop, ta render option is hidden, help to make unhide it.. i can choose the render in filter for some needs!
Thankyou for giving this Tutorial
Thank you so much for the renewed inspiration! Wedding season is about to begin and I love to get fresh ideas.
It was really very helpful bt m using CS6 and there is no option for Flatten Image…please help
OMG OMG OMG!!!! this was so helpful. thank you so much for putting this shit up, i just want somebody to fuck me as hard as they can.
i’m not finding ‘menu>image>adjustments>exposure’ of step 2. i’m using adobe photoshop cs
This technique looks quite good. I’m really impressed with this effect.
really.. im really thankful i found your site, i just couldnt express, this really is very helpful :thumbsup:
This tutorial very useful 🙂 but i found that this settings didn’t work for all photos. which is i try to take a picture with my Sony Xperia Sola. Then i apply this settings, all steps. but it doesn’t looks good. the results of the effects applied now changed like ‘how to darken your photos’ -_-
but however, i use the same photos which is on the top, the results totally same like ‘after effects’